Thursday, December 18, 2008

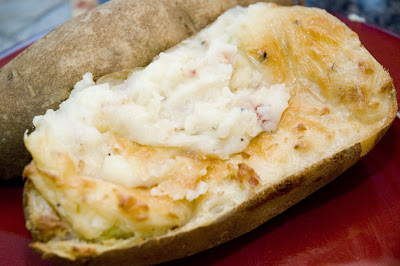
Holiday Feast for 10: Twice Baked Potatos

For as log as I can remember, we have had twice baked potatoes with every holiday dinner. I was trying to describe the glory of the twice baked potato to my friend Paul, and he summarized my wordy illustration quite nicely:

So you mean, it's like a potato skin with more stuff in it?

Exactly.

This recipe is great for many reasons, one of which is that this is another one of those foods that you can prepare in advance and keep in the fridge or freezer. They're very filling and taste great. They take a little work to make, which is why it's good to make them a few days in advance. No matter what, they always manage to impress. They especially come in handy when feeding large amounts of men.

The recipe does come with a disclaimer:

CAUTION: THIS IS NOT A HEALTH FOOD. Do not be deceived by this recipe's "vegetable" status. This is not your grandma's baked potato. This potato will hit you harder than the turkey, so be prepared for the Foma (Food Coma).

All American Twice Baked Potato
6 Baking Potatos
4 tblsp. Extra Virgin Olive Oil
2 tsp Sea Salt
1/2 cup + 2 tblsp Butter
1 1/2 cups Milk
10 strips Bacon, cooked and chopped
1 Leek, finely chopped
1 cup + 1/2 cup grated Cheddar Cheese

Preheat oven to 350*f
1. In a small bowl, mix olive oil and salt.
2. With a pastry brush, coat all of the potatoes evenly in the prepared oil.
3. Place potatoes on a baking sheet and cook in the oven until soft, about an hour.
4. When potatoes are soft, remove from oven and let them sit until they are cool enough to handle.

5. Cut the potatoes in half, length-wise (the hot dog way).
6. Scoop out the potato into a large pot over low heat. Make sure you leave the skins in tact because you're going to fill them at the end!
7. After all of the potatoes have been scooped into the pot, add 1/2 cup butter and the milk.
8. Mix with egg beaters.

- You are essentially making mashed potatoes here. You want them to be smooth and creamy. It might take some playing around to get the right consistency, so keep this in mind: Butter makes them creamy, milk makes them fluffy. You want to make them creamy, but too much butter will make them dense. So after you add your butter, add milk to make them as fluffy as you want them!

9. In a small pan, melt the remaining 2 tblsp. of butter over medium-low heat.
10. Add leeks and saute until they become soft and loose their sharpness.

11. Add bacon and leeks to the potatoes. Mix with beaters on low.
12. Add 1 cup cheddar cheese and mix again.

13. Fill the potato skins that you've set aside with the mashed potato mixture and set on a baking sheet.
14. Sprinkle the tops with the remaining 1/2 cup of cheddar cheese.

*At this point you can refrigerate or freeze the potatoes until you're ready to cook them.

15. Bake at 350*f until the cheese on top melts and begins to brown, about 20 minutes.
16. FOMA!


Wednesday, December 17, 2008

Festive Feast for 10: Portobello Mushroom Cups

I think it's an intrinsic quality of any foodie to love to entertain guests. Finally settled in my own place again, I've invited Jim's brothers and my siblings up for a Festive Gathering. While Jim cleans the apartment, I've been preparing the menu, cooking, and decorating. Many of the recipes I use are great year 'round, so I'd love to share a few of my favorites with you.

Events like this are like projects, and it takes a good amount of careful time management. Having some foods that you can prepare ahead of time is crucial. This recipe for Portabello Mushroom Stuffed Phyllo Cups is a go-to recipe for me. It's comes from my mom and has been a fail-safe for every big dinner I've prepared. They look nice, they make a great appetizer, and you can prep them as far in advance as you want, because you can freeze before baking. Oh, they taste awesome, too!

Portobello Mushroom Stuffed Phyllo Cups
2 10 oz. containers Baby Bella Mushrooms, finely chopped
2 tblsp. Extra Virgin Olive Oil
3 cloves Garlic, finely chopped
1 cup Fresh Parsley, finely chopped
1 cup Ricotta Cheese
1 cup Parmesan Cheese, grated
2 boxes "Athens Mini Fillo Shells" (found in the frozen food section, near pie crusts)

1) In a large skillet, over medium heat, saute the garlic in oil until it begins to soften.

2) Add the mushrooms to the skillet. Saute them, stirring constantly. They should reduce by half, becoming very soft. This takes about 10 minutes.

3) Once mushrooms become soft, mix in the parsley and saute for another minute.

4) In a medium sized bowl, combine the mushrooms, ricotta cheese and grated Parmesan. Stir together until the mixture appears to be thoroughly combined.

5) Fill the Fillo Cups (each one can hold about a teaspoon of mushrooms).

(At this point, after filling the cups, you can place them back in the box and freeze them until you want to use them.)

6. Place the cups on a baking sheet, bake at 350*f until the filled cup begins to brown and sizzle (about 20 minutes).


Friday, December 12, 2008

Baby, It's Cold Outside! Better get Chili!

It's December 12th! With Christmas less than two weeks away, and my holiday feast less than one week away, I've been cranking in the kitchen! The foods that I traditionally make in the winter are some of my favorite kitchen concoctions. For me, the best winter-time comfort food is Chili.

Today Jim, our friend Paul, and I are going to go chop down our Christmas tree. More specifically, I am going to pick out a tree, and Jim and Paul are going to chop it down while I take pictures. To thank them for their efforts, I'm making a big pot of chili to warm us up when we get home.

Like most of my recipes, this one started with my mom. Some of my fondest memories involve snow days, hot cocoa, and a bowl of chili covered in red onions and cheddar cheese. I've always been a fan of my mom's chili, but I'm also a fan of spicier fare. I gave this chili my own twist to make it hot, hot, hot!

******WARNING: SPICY FOOD AHEAD!******

Red Hot Chili...uh, Chili!
1 1/2 lbs. Ground Beef
1 15 oz. can Kidney Beans
1 Red Bell Pepper, diced
1 Red Onion, chopped
3 cloves Garlic, minced
1 can Crushed Tomatoes
2 Jalapeno Peppers, chopped
1 Chili Pepper, chopped
1 tblsp Extra Virgin Olive Oil
1 tblsp Red Cayenne Pepper
2 tblsp Chili Powder
1 tblsp Red Curry Powder
1 tblsp unsweetened cocoa powder
salt and pepper

Note: When I buy ground beef, I like to get it from the butcher. Ground beef can be sketchy if you don't know where it comes from. If you go to the butcher, you are more likely to get a higher quality, and fresher selection. You won't pay much more than you would buying it from the refrigerator section.

Now, this recipe moves pretty quickly, so it's best to cut your veggies first. There isn't a lot of down time.

1) In a large, heavy pot (I use a dutch-oven), over medium heat, drizzle olive oil. Add minced garlic, and saute until golden brown.

2) Next, add the chopped bell pepper, jalapeno peppers, chili pepper, and onion. Saute all of the veggies with the garlic until the peppers are soft and the onion begins to become translucent. Make sure you're constantly stirring the vegetables, if they just sit in the pot, they'll steam.

3) Remove the veggies from the pot, and set aside for the time being. Add the ground beef to the pot and brown it thoroughly. Stir it consistently to make sure it gets broken up, this will ensure that you don't get ginormous meat chunks in your chili (unless you're in to that sort of thing).

4) After the beef is brown, sprinkle it with salt and pepper. Add the veggies back in to the dish, add the Kidney Beans and mix together.

5) Next add your spices: Cayanne Pepper, Chili Powder, Red Curry Powder, and Cocoa Powder. Mix in to beef and veggie mix.

Believe it or not, the Cocoa powder compliments the chili powder perfectly, and gives the chili a rich color and flavor. Don't leave home without it!

6) Finally, add the crushed tomatoes and stir it up. Reduce the heat to low/simmer and let the chili simmer with the top off for 30 minutes. Put a lid on it and let it cook together for another hour. The good part is, you can't over cook it. You can keep it on low heat until it's ready to eat!

Serving Suggestion: A TON of grated extra sharp cheddar, chopped red onion, and a dollop of sour cream!


Stay warm and enjoy!

Wednesday, December 3, 2008

It's the Great Pumpkin Bread, Charlie Brown!

We all know that the holidays carry with them one constant: Food! More specifically, desserts.

This entry is a good way to ease in to the holidays, and it addresses an unrelenting cultural phenomenon: the sudden and intense worship of the pumpkin. In October we carve them up, and for the rest of the holiday season we're downing slice after slice of pumpkin pie.

For something a little different, I make pumpkin bread. The reason behind this is twofold:

1) A girl can only eat so much pumpkin pie before it starts to loose it's novelty.
2) My mom raised me so well that I could never eat a slice of pumpkin pie for breakfast without feeling ridiculously guilty (blueberry pie is a whole different ballgame).

With those two things in mind I created this pumpkin bread recipe. It's sweet, moist, has a little spice to it, and goes great with a cup of coffee in the morning -- or after dinner! The cream cheese glaze makes the cake, I mean, bread!

Preheat your oven to 350*f, and we'll get started.

The Great Pumpkin (Bread)
1 1/2 cups Flour
1 cup Sugar
1 tsp. Baking Soda
1 1/2 tsp. Cinnamon
1/2 tsp. ground Clove
1/2 tsp. ground Nutmeg
1 tsp. Salt
2 Eggs, whisked lightly
1/4 cup Butter, melted
1 (16 oz.) can Pureed Pumpkin

1) Grease a loaf pan with butter. You can use a baking spray, but I am like a petite, northern, Paula Dean. I like my butter.

2) In a medium bowl sift together flour, sugar, baking soda, spices, and salt.

3) Next, add the eggs and butter. Incorporate them in to the flour mixture.

4) Mix in the pumpkin until the batter is smooth.

5) Pour the batter in to the greased loaf pan, and bake at 350 degrees until a toothpick inserted comes out clean (about 35 minutes).

After the loaf comes out, let it cool. Once you can handle it, take it out of the pan and place it on a rack. After it cools, top it with the cream cheese glaze.

Frosting, SOMETIMES, is a little excessive. This is already a sweet bread, but it's so nice to have the warm spice of the bread with the coolness of cream cheese. Using a thick glaze instead of a full on frosting works this magic without overwhelming the main event.

Cream Cheese Glaze
1 (8 oz.) package Cream Cheese
1/2 cup Granulated Sugar
1/2 cup Confectioners Sugar
1/4 cup Butter, softened
1 tblsp. Vanilla Extract

In a bowl, combine all of the above ingredients. Beat on HIGH until the mixture is smooth, for about a minute. The glaze should fluff up a bit. It should look and taste like cheese cake batter, but it will be a little thicker. Keep it in the fridge until you're ready to glaze your bread.

This bread is so delicious, I actually like it better than pumpkin pie! It strikes a great balance between spicy and sweet, breakfast and dessert... It's the Great Pumpkin Bread, Charlie Brown!

Tuesday, November 11, 2008

This is so Corny! (Healthy!)

When the days start getting shorter and the air acquires a little chill you know that 4PM sunsets and the constant need for wool socks are getting close. If I may get a little clinical on you for a moment, decreased amounts of sunlight means a reduction in serotonin production, which could mean lots of unpleasantness for both mind and body. Decreased serotonin levels can lead to depression, anxiety, weight gain, chronic pain, reduced libido, and problems in your digestive system.

I like to stave off any of the above by making sure I get plenty of exercise, spend time outdoors, engaging in as many productive activities as I can, and (of course!) eating well! In addition to being healthy, this recipe helps me cling to warm weather. In our house, this is a summer staple.

Corn Salad
3 cups Corn (preferably freshly grilled, but you can use frozen too!)
1/2 cup Red Onion, finely chopped
1/2 cup Fresh Basil, chopped
1/3 cup Olive Oil
1/4 cup Red Wine Vinegar
Salt and Pepper

1) Combine corn, onion, and basil in a bowl.

2) Drizzle olive oil and vinegar, toss.

3) Add salt and pepper to taste!


It's super easy!
It tastes so good!

Friday, October 31, 2008

Part 3: Not Your Average Fry

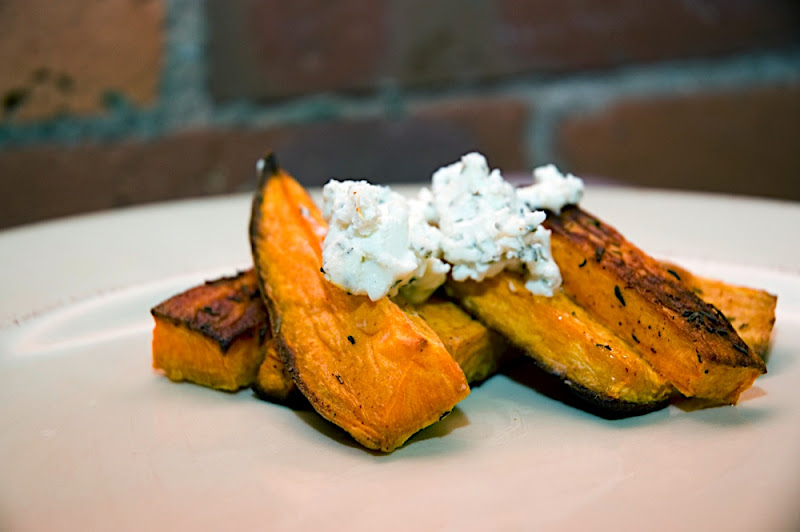
There is a Tapas restaurant by my parent's house that delivers a satisfying experience every time. The great thing about tapas is that you can try different combinations of tapas every time. One item on the menu that has been a standard whenever I go, is Sweet Potato Fries with Honey Goat Cheese.

I needed a starch to go with my pork chops and salad. I wanted something that would warm me up and add to the sensory experience of the meal. I decided to make a slightly more outgoing version of this dish, a perfect compliment to the rest of the meal. It also adds a little spice and excitement. This is one sexy potato!

Sweet Potato Oven Wedges
1 large Sweet Potato
4 tblsp Extra Virgin Olive Oil
1 tblsp Garlic Powder
1 tsp Cayenne Pepper (Hot Hot Hot!)

Preheat the oven to 400*f

1) Peel the potato and cut it in to medium sized wedges. The easiest way to do this is to quarter the potato and then slice it.

2) Drizzle oil on to a medium sized cookie sheet. Also sprinkle the garlic powder and cayenne pepper. Use a pastry brush to mix and spread the spices/oil, coating the sheet.

3) Arrange the potatoes on the sheet, rubbing them in the oil, and using the brush to apply any excess oil to the surface of the potatoes. You don't need to be too rigorous doing this, we want to keep most of the spice on the bottom.

4) Put them in the oven! Keep the temp at 400*f for 15 minutes, and then drop it to 300*f until the rest of your meal is ready. Don't worry, they won't dry out in all of that oil, they'll just get a good tan.

Honey-Tarragon Goat Cheese
(this is the best!)

1/4 cup Goat Cheese (plain, room temp)
1 tblsp Honey
1 tsp Tarragon

1) After the cheese meets room temperature, add the honey and the tarragon.
2) Mix it all up and serve with the potato wedges.


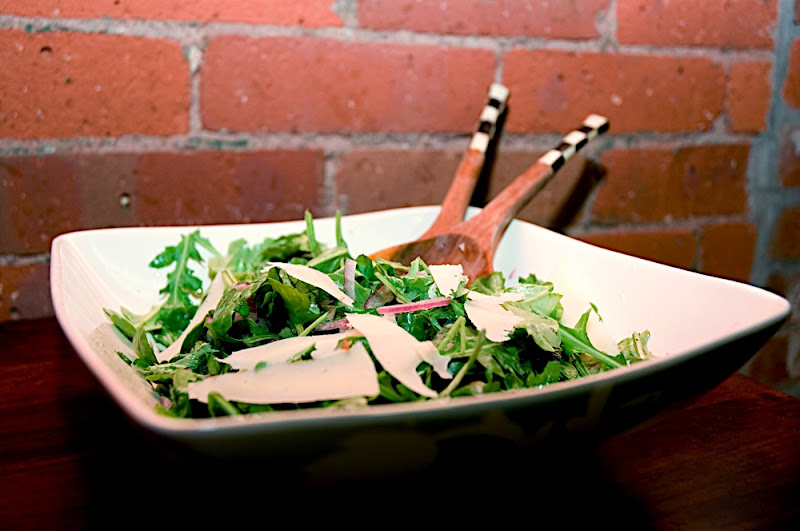
Part 2: Five Star Arugula Salad (Healthy!)

Whenever I'm making a fancy-pants dinner, and I need a light green, this is my go-to salad. Even if you don't like arugula normally, I encourage you to give this a shot. This is an elegant salad, full of wonderful flavors that balance eachother perfectly. I'd love to give you a quirky story about this salad, but the short-winded truth is that I just love every part of it. It is so fresh tasting and refreshing... one of those salads you just feel good about eating.

Arugula Salad

1/2 package Baby Arugula (I like Olivia's Organics).
10 large Fresh Basil Leaves
1/2 Red Onion, finely sliced and chopped
1/4 cup Extra Virgin Olive Oil
Juice from 1/2 a Lemon
1/2 cup Parmesan Shavings
Salt and Pepper to taste

1) Drizzle half the olive oil in the bottom of your salad bowl.
2) Chop the onion and add that to the bottom of the bowl.
3) Add the arugula and basil.
4) Combine the remaining olive oil and lemon juice, toss in the salad.
5) Use a vegetable peeler to make shavings of parmesan, sprinkle over top of salad.
6) Add salt and pepper to taste, and slightly toss.

Notes:
- It's okay if you cant get your hands on a fresh bunch of basil, it will taste fine without it. Just don't replace it with flakes... it's not the same, I don't care what your aunt Esther says.

- Parmesan is a vital part of this salad, but times are tough and I don't want you putting yourself over for a block of parm. Use crumbled parmesan or the pre-grated stuff.

Part 1: My Favorite Pork Chops

Hello again! Many apologies for the month-long lag in tasty updates. I could fill you in with all of the craziness that kept me away from the computer, but I know you only come for the food! There is good news, though! Even though I never got the opportunity to sit down and write up the recipes, or take photos, I've been creating and testing a TON of new recipes. I have an arsenal to share with you! Let's get down to business.

I made a simple dinner that will knock your socks off. It's so pretty, and you've been so patient, I've decided to share the entire experience with you in a three part entry!

I wanted to make a romantic dinner for two this past night, as it was just Jim and I. I had worked all day, and Jim had a lot of studying to do, so this wasn't a good night for any intensive cooking. I had some pork chops in the freezer, so I used that as my inspiration.We used to eat this all the time at my house: pork chops, salad, and some sort of a potato. I decided to take this comfy, family-style dinner and fancy it up a bit. A few key ingredients make this meal lighter and more elegant, and even Jim was surprised when dinner was ready in only 20 minutes!

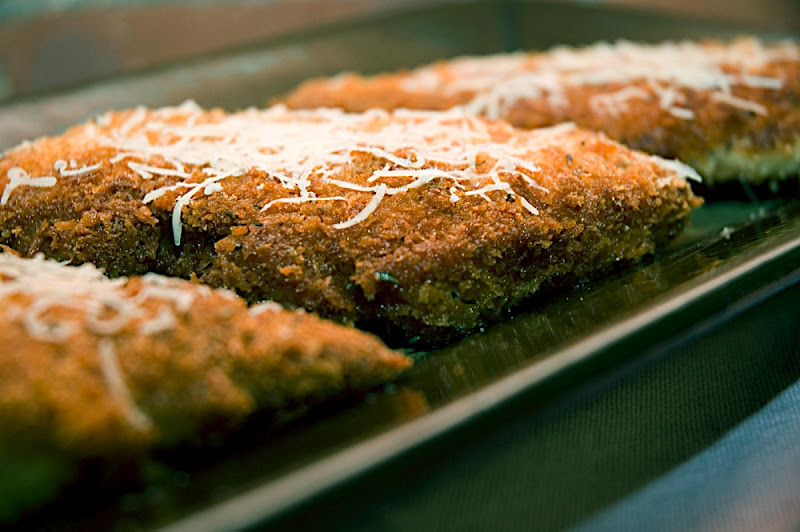
Breaded Pork Chops

I have never been a big fan of the pork products, but my mom always managed to create some sort of dish to sneak it in to my diet. For a girl who hates pork chops, I was surprised to learn that I loved these! This recipe is further proof to my theory that anything is better breaded and fried. Fried food isn't the best health-conscious decision, which is why I use panko (Japanese style breading) which is much lighter than your standard bread crumbs. Here is how you do it.

1 Pack Boneless Pork Chops
1 cup Flour
1 Box Panko Japanese Bread Crumbs
1 Egg
1/4 Cup Water
2 tblsp Tarragon
1/2 tsp salt
1/2 tsp pepper
1/2 cup Vegetable Oil
1/2 cup Parmesan Cheese (grated)
(wax paper)

1. Lay out the wax paper on your counter, long enough to spread out the pork chops. After you've placed the chops on the paper, lay another piece on top of them.

2. Using the smooth side of a mallet (or rolling pin, or frying pan... you get the idea) beat the chops until they are half their original thickness. This helps them to fry up nicely, and tenderizes the meat.

3. In a bowl, mix the egg and water until uniform and combined.

4. On a large plate, combine the panko, tarragon, salt, and pepper. Toss these dry ingredients around until they are thoroughly integrated.

5. In a large frying pan, add the vegetable oil. The oil should cover the bottom of the pan. Heat over medium to medium-high heat. You can test the heat after a few minutes by splashing a drop of water in the pan. If it spits, you're ready to roll.

6. This is the part where you can't be afraid to get your hands dirty. First, pick up your pork chop and dredge it in the flour so that it's evenly coated.

7. Next, take that pork chop and dip it in the egg mixture so it's completely coated. Make sure both sides are covered, and let any excess drip back in to the bowl.

8. Then, place the pork chop in the panko mixture, pressing down to make sure that the bread crumbs embed into the meat. Do this to both sides repeatedly until the chop is densely covered. This is important because a densely covered pork chop won't loose it's breading when it hits the oil.

9. After coating the pork chop, drop it in the oil. Repeat this with all of the chops.

10. Let them cook until they are browned on each side, flipping with tongs only once. When you pull them out, place them on some paper towels to absorb the oil.

If you're going to be a few minutes before eating them, preheat your oven to 250*f to keep them warm.

10. Plate them, and sprinkle with grated Parmesan cheese, salt and pepper to taste.

Notes:

- If you can't find panko, it will still taste fantastic with regular bread crumbs, you could even use Corn Flakes. They will just be a little heavier and the taste will be slightly different. I like having control over the flavors.

- If you can't get fresh Parmesan, the pre-grated variety will taste just fine!

Thursday, September 18, 2008

Berry Delicious

I think we can all agree that berries are synonymous with summer. With autumn on our heals and the nights becoming a bit more crisp, we're being reminded that colder months are on their way.

One way I like to latch on to summer is by making a trifle, which is really just layers of cake, fruit, and whipped cream. Traditionally, it would also have custard and perhaps jelly in it. This is my half-assed version. It's a nice, fresh tasting, light dessert, that's so pretty you won't want to eat it. My mom makes trifle for just about every major dinner: 4th of July, Christmas, Easter, Thanksgiving... it just goes with everything. We had it after meatloaf and mashed potatoes.

Besides, berries won't be in season much longer. Take advantage of them now! The trifle that I made only had strawberries (hey, I'm working on a budget and they were on sale!), but you can add raspberries, blackberries, peaches, bananas... any soft fruit that you can cut into a bite-sized piece.

Berry Trifle

1/2 Angel Food Cake Ring, sliced thin
2 lbs. Strawberries, cut into quarters and rinsed
2 cups Heavy Cream
1/2 cup Kirshwasser (or other fruit brandy)
1/4 cup plus 2 tblsp. Sugar
A hand-full of fresh mint leaves, chopped
1/2 cup Chocolate Chips
You will need a trifle dish (see photo below).


1. In a medium bowl, mix berries, 1/4 cup of sugar, mint, and Kirshwasser. Let sit for (at least) ten minutes. (You can do this at any point before hand. The longer the berries marinate in the Kirsh and sugar, the better. The Kirsh and sugar will break them down a bit and make them syrupy.)

2. Take the slices of Angel Food Cake and line the bottom of your trifle dish. Pack them down.

3. Pour berry mixture on top of the Angel Food Cake.

4. In a mixing bowl, combine heavy cream and 2 tblsp. sugar. Beat them with an electric mixer (or whisk) until stiff peaks form. This means that when you stop beating the cream, and lift the whisk out, the cream will hold its form.

5. Spread whipped cream on top of the berries.

6. Sprinkle top with chocolate chips.

*Make this dessert ahead of time. That way, while you're eating, the Angel Food Cake will soak up the liquid from the berries and Kirsh. Just make sure you keep it in the fridge!


Suggestions:

- If you wanted to make this more indulgent, you could do a few things differently. You could a) make your Angel Food Cake from scratch, b) add a layer of custard between the cake and the berries. This is how I would ideally make it. Custard is basically just cream, egg yolks, and sugar.

- Girls night out? Special dinner party? Instead of using a trifle dish, cut your cake even smaller and make individual trifles inside of martini glasses! This is another one of those things that looks impressive with very little effort!

Tuesday, September 16, 2008

Show Me Some Mussel! (Healthy!)

I had a crazy week last week (hence the lack of posts). There was a lot of back-and-forth between my parents' house and my apartment, an ongoing juggle that lasted about ten days. I found myself at home on Friday night. After six hours of class and the impending trip back to Fairfield that evening (again), the last thing I wanted to do was cook a meal -- but I didn't want take-out either.

We could all agree that we wanted some sort of dessert, blueberry pie to be exact. So we went to the grocery store with the hopes of finding a half-decent frozen variety. I love going to the grocery store, because that's where you'll find inspiration when you're running on fumes.

Lo and behold, Prince Edward Island mussels were on sale for $1.99/pound. Little Neck clams were $5.99/pound. Eureka.

First, let me tell you a little about why mussels in white wine sauce is such a stellar meal:

1) It's a classic. You'll find Mussels Provencale or Mussels in White Wine Sauce in any decent French or Italian restaurant. My youngest sister knows this best, she gets it whenever it's on the menu.

2) It's easy. The prep time is minimal and you can't over cook it. It only involves 5 staple raw ingredients.

3) It's great for "date night". I've been with Jim for over 5 years and this meal still impresses. For you first-daters out there, this meal is great because it looks and tastes impressive, but its so easy! Plus, you'll spend more time interacting with your honey than with your stove. I think that's important. Set a nice table and light a few candles... you can't beat it!*

4) You get a lot of bang for your buck. Pasta is cheap and, if you play your cards right, so is the shellfish.

So let's get this show on the road.

Mussels and Clams Provencale

1 lb Prince Edward Island Mussels
1 lb Little Neck Clams (the little ones are best)
3/4 Cups Butter (1 1/2 Sticks)
4 Cloves Garlic, chopped
2 1/2 Cups White Wine (Chardonnay, Pinot Grigio, Sauvignon Blanc)
1 Cup Fresh Parsley, chopped (optional)
Grated Parmesan Cheese (optional, for serving)
Lemon Wedges (optional, for serving - lemon always tastes good on seafood)

1) The shellfish are alive. First you have to give them a quick rinse, then place them in a bowl with cold water (if you use hot water, they'll start to cook). This gets them to spit out any sand, etc. that might still be inside. Let them sit for 5-10 minutes. If you have an old toothbrush, use it to gently rub any excess gunk off the shells. Drain in a colander and rinse again.

2) In the meantime, get your spices ready. Chop the garlic (you can keep the pieces somewhat larger than usual), and quickly run your knife through the parsley. Basically you just want to release the flavors.

3) In a shallow sauce pan, over medium heat, melt a stick of butter (1/2 cup). Tip: If you cut it up a bit, it will melt faster.

4) Once the butter is melted, add and saute the garlic. Cooking the garlic in butter, over medium heat, will keep it from cooking too quickly and burning. When garlic cooks slowly it looses its sharpness and gets a nice sweet flavor, which is what we're going for here. Saute until the garlic begins to soften and break down.

5) Throw in the mussels and clams. Right in the pot. They'll steam a minute and start to open up.

6) Add the white wine. About 2 1/2 cups should do. This is all of the liquid you'll be cooking them in, so you want to make sure there is enough to just about cover them (be careful when eyeballing this... mussels float!) Also add the remaining 1/4 cup of butter. The butter makes the dish a little more rich and creamy, and helps the sauce hold together.

7) Turn to high heat to bring to a boil, once it boils reduce to a simmer and cover them up. Let them simmer for about 10-15 minutes until all of the shellfish open up and the alcohol in the wine cooks off.

8) Once they all open up, they're done!

9) Toss in the parsley and throw it all in a bowl!

Now for some eating options!

- You can make it a pasta dish. If you do, use a box of linguine, it holds the sauce really well. Dump the mussels and sauce over the pasta and toss it with some tongs. Just make sure you have a big bowl.

- You can get a French baguette or a loaf of Italian bread and use that to soak up the sauce. You can eat the bread as it is or...

- Cut the Italian bread into thick slices. Drizzle with olive oil and toast in the oven until the crust begins to crisp. When you take it out, rub it with a clove of garlic that has been cut in half. Make sure you do this while the bread is still crispy and hot. This is my favorite because the sides and crust of the bread get a nice crisp and then the inside is still soft. Great for soaking up that Provencale sauce!


This really is a stellar meal. You can see how excited I get about it. It takes no effort to cook and very little skill. I spent about $8.00 on the mussels and clams - that's about the same you'd spend on a pack of chicken breasts and way less than a steak. The box of pasta only cost me a dollar. I always have garlic and wine in my kitchen, and you don't have to use a good wine. This is a great "some for me, some for the pot" recipe! Plus, it fed me and two growing boys!


*This is especially helpful for the guys out there. Nothing is more impressive than a charming guy who can cook.

P.S. Chef Pierre makes an amazing frozen blueberry pie!

Wednesday, September 3, 2008

This Bread is Bananas, B-A-N-A-N-A-S!

There is something you should know about my mother: She gets out of bed at 6:30 AM at the latest every morning. Every morning. One of the perks of having an early-riser mother , particularly my mother, is that most weekend mornings I'd wake to the smell of something cooking (I feel like a lot of entries are going to start like this). I was never a big breakfast person, but I always got a little excited when my mom made banana-nut muffins.

Well, with an allergy developed later in life, and a sensitive belly, banana bread has become a staple in my diet. Bananas are the 'B' in the BRAT diet-- which stands for Bananas Rice Applesauce (and) Tea. While I used to be ordered to pick up the BRAT diet by doctors, I now adopt it when my stomach is extra sensitive... and of course I've adapted it a little to make it a bit more exciting (Banana bread, Rice pudding, homemade Applesauce, and Tea).

You could make muffins instead of a loaf, I just hate dealing with those little cups. I always make a mess. So here's how you do it:

Banana Bread
1 1/2 Cups Four
1 Tsp. Baking Soda
1 Cup Sugar
2 Eggs
1/4 Cup Melted Butter (plus, 1 Tblsp.)
3 Bananas
1 Pinch Salt

Preheat the oven to 350*f
1. Combine the flour, baking soda, sugar, eggs, butter, and salt in a medium bowl.
2. In another medium bowl, mash up the bananas.
3. Add the bananas to the flour mixture and mix thoroughly.
4. Grease a loaf pan with 1 Tblsp. butter and flour the pan to be sure the loaf doesn't stick.
5. Pour in the batter and stick it in the oven!
6. When a wooden dowel inserted into the middle of the loaf comes out clean, the bread is done.

A few notes:
- To make a loaf, the bread does take a bit of time to cook. The best part? Cooking it nice and slowly makes for a nice crispy, crusty, top, and a soft, sweet inside!

- This is a great recipe for old bananas. When the bananas start to get brown spots on the peals and get really soft they're kind of funky to eat, so use them to make bread or muffins instead. If you don't want to make bread right away, throw them in the freezer until you do.

- You could really go to town with this bread. Nuts, chocolate chips, raisins, dried cranberries, even chopped apples taste great in it!

Friday, August 29, 2008

Crunchy, Granola Heads. (Healthy!)

This recipe was inspired by my little sister Casey (she's 12). She took an after-school cooking class in elementary school (she wanted to compete with the big dogs). In this class she learned a bunch of microwave recipes -- most of them were surprisingly good. One of them was a recipe for granola.

Since I have a severe nut allergy, Casey has been put on the task of keeping the house supplied with nut-free granola. This basically went on for the year and a half that I was living at home. Well, now I have to fend for myself. After watching Casey, and completely butchering two huge batches of the cereal - i was fortunately able to clear the smoke before Jim got home - I think I've finally got it right.

Granola for Two

2 Cups Oats (plain ol' Quaker oats will do)
1/2 Cup Shredded Coconut
1/2 Cup Dried Cranberries
3 Tblsp. Packed Brown Sugar
1 Tblsp. Honey
2 Tsp. Vegetable Oil

If you want to make the granola in the oven:

1) Mix the oats, sugar, honey, and veggie oil.
2) Spread it on a baking sheet and cook in the oven at 275 degrees, mixing every 15 minutes.
3) Then put it in a bowl and add the coconut and cranberries.
4) Let it chill out in the fridge until it sets.

If you want to make the granola in the microwave:

1) Just mix it all in a microwave-safe bowl.
2) Microwave it for 2 minutes, stopping every 15 seconds to stir and make sure it isn't burning.

You really can have fun with this recipe. You can add different types of dried fruits, nuts, use syrup instead of honey for a more nutty flavor, add some chocolate chips to make it fun and kid-friendly... it's really an "everything but the kitchen sink" kind of thing. The best part is that you can munch on it plain, throw some milk in and call it cereal, use it as a topper for ice cream, or stick it in a bowl of yogurt with some fresh bananas to make it a well balanced (and really tasty) breakfast!

I was going to put mine on ice-cream, so I mixed it up with chocolate chips while it was still warm. The chocolate got a little melty and it tasted like a giant, crunchy, chocolate chip cookie. Yum!


Wednesday, August 27, 2008

Thai Red Curry Paste, It Swings Both Ways! (Healthy!)

I love cooking for my friends, like I said. It was when my good friend Leif moved into her new apartment a few years ago that I ran in to a minor hurdle: Leif is a vegan. No dairy, no meat. I'd never cooked a vegan meal before, but I wanted to make her a great house-warming dinner. It was then that I remembered the enormous vegan population in Asia, specifically Thailand, which is primarily Buddhist. Leif had actually just been in Thailand, so it was a perfect fit.

Thai Red Curry is a fantastic dish because sit is so versatile. Embodying all of the major flavors of Thailand (lemon grass, coconut, lime, garlic, chili, and basil), this concentrated paste is a blast of flavor. The best part? You can make it with vegetables and keep it vegan, or you can add chicken, shrimp, or beef to make it more hearty -- it swings both ways!

Tonight I'm making this for Jim and Paul. It's so easy to prepare and goes great with a glass of dry white wine or a cold dry beer. So here's how you do it:

Thai Red Curry Paste

2 Shallots, chopped
1-3 Red Chili Peppers (depending on how hot you like it)
3 Cloves Garlic
2 Tblsp. Lemon Grass Paste
1 good-sized piece of fresh ginger (about 1/2 inch), chopped
1/4 Tblsp. White Pepper
1 Tblsp. Cumin
2 Tblsp. Coriander
2 Tsp. Sugar
2 Tblsp. Chili Powder
1 Can Coconut Milk

1) In a food processor, combine the shallots, peppers, garlic, lemon grass, and ginger - zap it.
*) I use whole cumin and coriander and grind it up with a mortar and pestle, you could use ground coriander and cumin, but the flavor won't be as intense (which might be good if you don't like your food too spicy)
2) Add white pepper, cumin, coriander, sugar, and chili powder - zap it again.
3) Mix in 1/4 cup of coconut milk to make a creamy paste.

That's it for the paste!

Now, to turn it in to a meal:

2 Tblsp. Olive Oil
1 Clove Garlic, minced
1 Red Onion, chopped in medium pieces
Coconut Milk (the remainder of the can)
1 Contianer Baby Bella Mushrooms, cleaned and stemmed
1/2 of an Eggplant, chopped
2 Red Bell Peppers, chopped
6 Red Bliss Potatoes, boiled until they start to get soft in the middle, quartered
5-6 Leaves of Fresh Basil, lightly chopped
Thai Red Curry Paste

1) In a large, deep pan (preferably, a wok) heat olive oil and saute the garlic.
*) Add thinly sliced and chopped pieces of boneless chicken breast.
2) Add the red onion and saute until it's soft and translucent.
3) Next add the mushrooms, red pepper, and eggplant. Mix in the remainder of the coconut milk, cook the veggies until soft.
4) Throw in the potatoes!
5) Add the curry paste 1/4 cup at a time until the dish is as hot as you like it. If you need to cut the spice, add more coconut milk. Cook 15 minutes between each addition to allow the spices to settle in to the veggies.
6) Mix in the fresh basil

Serve it up over an aromatic rice, like jasmine rice!

* To slice the chicken breasts, cut them in half width-wise so that you are making them half as thick. Then, place the half between two pieces of wax paper and beat it with a mallet (that's the fun part). Slice the nice thin piece of chicken into 1" x 2" pieces. It'll cook faster and be more manageable in the dish.

That's it! It's flavorful, pretty, and fresh. You can make it heavier by adding some meat, or creamier by adding more coconut milk. It's a snap to put together and the only expensive parts of the recipe are the spices, which have a long shelf life and you'll use over and over. If you need to cheapen it up, take out some of the fresh veggies and add some frozen ones. Peas are a great addition and you can find frozen bell peppers in most food stores.

Let me know how you like it!
Enjoy!

Why?

So Jim and I have moved to Manchester. We're living right across the street from Paul, which is great! Because I'd never let a friend go hungry, Paul has been eating a few meals with us. The apartment doesn't have any overhead lighting, so I've had to light a candle at dinner, creating an ambiance that could only be described as a "romantic dinner for three".

I've been getting some good reviews from the local foodies.. namely Paul and Jim. Cooking for my friends has always been one of my favorite things to do! On my birthday, I cook for my friends. For Christmas, I cook for my friends... you get the idea. Now that I'm able to prepare the meals I like, for people I like, in the way that I like, I really want to keep a record of the dinners I make. What better way to do that (and remember the recipes), then to keep them posted here. The bonus is that I can share all of these recipes with you fine folks.

Some of them I've known how to make for years from recipes that have been passed down in my family. Others are personalized and modified versions of some of my all time favorites. The last bunch are recipes that I find that I can't resist but to make and share, giving credit where credit is due, of course.

Enjoy!